Table of Contents
ToggleA tiny home shell gives you the foundation without the finish, walls, roof, framing, and weatherproofing in place, interior left to you. It’s a smart middle ground for buyers who want to avoid site-built construction costs but aren’t ready to move into a turnkey unit. Whether you’re looking to DIY the build-out on a budget or hire pros for specific trades, buying a shell lets you control the timeline, layout, and finishes. This guide walks through what’s on the market in 2026, what you’ll pay, and how to evaluate options before you commit.
Key Takeaways
- A tiny home shell for sale provides structural framing, roofing, and weatherproofing with an unfinished interior, allowing buyers to control costs, customization, and timeline while saving 30–50% compared to finished units.
- Trailer-mounted shells typically range from $15,000–$40,000, while skid-mounted options cost $12,000–$30,000, with total project costs landing between $30,000–$80,000 when factoring in interior finishes and labor.
- Inspect the frame quality, verify weatherproofing and sheathing integrity, check window and door standards, and confirm RVIA or code compliance before committing to a tiny home shell purchase.
- DIY finishing can reduce build-out costs by 40–50% if you have basic carpentry and electrical skills, but hiring licensed professionals for structural work, HVAC, and electrical rough-ins is often necessary for code compliance and safety.
- Source tiny home shells from dedicated manufacturers, local trailer builders, or online marketplaces; always verify builder reputation through BBB and reviews, and budget an additional $1.50–$3.00 per mile for professional delivery.
What Is a Tiny Home Shell and Why Buy One?
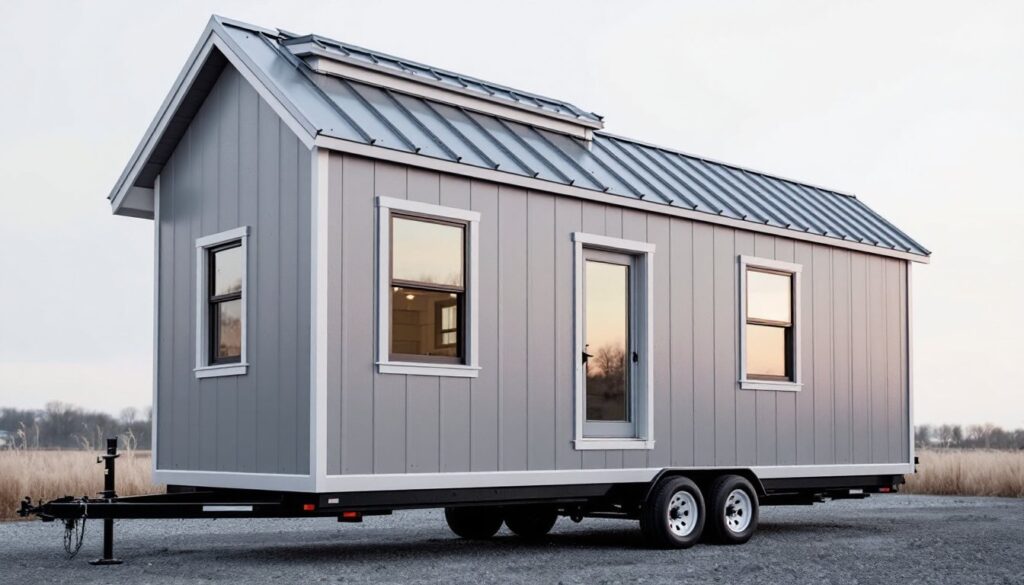
A tiny home shell is a structural skeleton: framing, exterior sheathing, roofing, windows, and doors installed, but no interior finishes. You won’t find insulation, drywall, plumbing, electrical, flooring, or cabinetry, those are on you. Shells are typically built on trailers (for RVIA-compliant towable models) or skids (for foundation or semi-permanent placement).
Buyers choose shells for three reasons. First, cost control, you’re not paying builder markup on finishes or appliances. Second, customization, you decide on wall treatments, fixtures, and layout down to the outlet placement. Third, phased budgeting, purchase the shell now, finish the interior as funds allow.
Shells aren’t for everyone. They require tool access, trade knowledge (or willingness to learn), and time. If you’ve never run electrical or installed a subfloor, expect a learning curve or contractor invoices. But for hands-on builders, a shell can cut total project cost by 30–50% compared to a finished tiny home.
Types of Tiny Home Shells Available on the Market
Trailer-mounted shells are the most common. Built on a dual-axle or tri-axle trailer, they’re towable and meet DOT width limits (usually 8’6″ wide). Lengths range from 16′ to 28′: anything over 24′ may require special towing permits depending on your state. Look for trailers with a GVWR (gross vehicle weight rating) that accounts for finish materials, a 20′ shell on a 10,000 lb GVWR trailer leaves about 3,000–4,000 lbs for build-out.
Skid-mounted shells sit on treated timber runners. They’re not road-legal but can be crane-lifted or flatbed-hauled to a site. Skids work well for permanent or semi-permanent ADUs (accessory dwelling units) and often allow wider floor plans, up to 10′ or 12′, since DOT limits don’t apply.
Modular panel kits ship flat-packed. You bolt together SIPs (structural insulated panels) or prefab wall sections on-site. These aren’t true shells since assembly is required, but they’re popular with DIYers comfortable with power tools and a level. Kits often include fasteners, flashing, and instructions.
Some manufacturers offer partial build-outs: shell plus insulation and subfloor, or shell plus rough-in plumbing and electrical. These hybrids cost more but save labor if you’re outsourcing trades. Many modern prefab manufacturers now provide semi-custom shell configurations, letting buyers pick window placement and door styles before fabrication.
How Much Does a Tiny Home Shell Cost?
As of 2026, expect to pay $15,000–$40,000 for a trailer-mounted shell, depending on size, materials, and builder. A basic 16’–20′ shell with vinyl windows, metal roofing, and LP SmartSide siding runs $15,000–$22,000. Upgrade to cedar lap siding, energy-efficient dual-pane windows, and architectural shingles, and you’re closer to $28,000–$35,000. Shells over 24′ or with custom dormers, lofts, or bump-outs can hit $40,000+.
Skid-mounted shells cost slightly less per square foot since there’s no trailer expense, figure $12,000–$30,000 for comparable sizes. Panel kits start around $10,000 for a small 120 sq ft shell but require significant on-site labor.
These prices do not include:
- Insulation (spray foam, fiberglass batts, or rigid foam)
- Interior framing or partition walls
- Electrical rough-in and finish (panel, wiring, outlets, fixtures)
- Plumbing (PEX lines, fixtures, water heater, greywater/blackwater tanks or hookups)
- HVAC (mini-splits, propane heaters, or ventilation)
- Flooring, drywall, trim, cabinetry, countertops, appliances
Budget another $15,000–$40,000 for a basic DIY finish or $30,000–$60,000 if hiring out trades. Total project cost typically lands between $30,000 and $80,000, depending on finishes and labor.
Prices vary by region, lumber costs, and demand. In high-cost metros or during material shortages, add 10–20%. Always request an itemized quote and confirm what’s included, some builders list “shell” but include underlayment or housewrap that others charge separately.
What to Look for When Buying a Tiny Home Shell
Start with the trailer or foundation. For trailer-mounted units, verify the frame is welded steel (not bolted), hot-dip galvanized, and rated for the finished weight. Check the axle count, tire load rating, and brake type (electric brakes are standard). Confirm the title and VIN are clean if you plan to register it.
Inspect framing lumber. Most shells use 2×4 wall studs on 16″ centers and 2×6 or 2×8 floor joists. Roof trusses should be engineered and stamped, especially for snow loads. Avoid shells with visible twist, bow, or split studs, straightening framed walls after delivery is a headache.
Sheathing and weatherproofing matter. Exterior walls should have OSB or plywood sheathing, housewrap (Tyvek or equivalent), and properly flashed windows and doors. Metal roofing should be screwed (not nailed) with overlapping seams and ridge caps. Asphalt shingles need underlayment (felt or synthetic). Any gaps or exposed fasteners are entry points for moisture.
Check window and door quality. Vinyl or aluminum-clad windows with dual-pane glass are standard: single-pane units are a red flag unless you’re in a mild climate. Exterior doors should be steel or fiberglass with weatherstripping and a keyed lock. Confirm rough openings are square and sealed.
Ask about warranty and builder support. Reputable builders offer at least a one-year warranty on structural defects and weatherproofing. Some provide build-out consulting or sell finish packages (cabinets, fixtures) as add-ons.
Finally, confirm code compliance. If the shell is trailer-mounted and you want RVIA certification later, it must meet RVIA standards (ceiling height, egress windows, etc.). For foundation models, check local IRC (International Residential Code) requirements and whether the design can pass inspection. Designs featured in contemporary tiny home showcases often highlight code-friendly layouts worth reviewing.
Where to Find Tiny Home Shells for Sale
Dedicated tiny home builders are the most common source. Many fabricators offer shell-only pricing alongside finished models. Search for “tiny home shell,” filter by your region, and request quotes from 3–5 builders. Ask for references and photos of completed shells.
Local trailer or shed manufacturers sometimes build custom tiny shells. They’re used to framing, sheathing, and weatherproofing and may charge less than specialized tiny home companies. Bring dimensioned plans or sketches and confirm they understand towable width/height limits if going trailer-mounted.
Online marketplaces like Tiny House Listings, Craigslist, and Facebook Marketplace occasionally feature shells. Buying used or unfinished inventory can save 20–30%, but inspect in person and verify the trailer or skid condition. Avoid shells with water damage, mold, or structural sag.
Manufacturers selling direct often ship nationwide. Delivery costs vary, figure $1.50–$3.00 per mile for professional transport of a trailer-mounted shell. Some builders include delivery within a regional radius: others charge flat fees ($500–$2,000 depending on distance).
Check builder reputation via BBB, Google reviews, and tiny home forums. Red flags include no physical address, no warranty, or pressure to pay in full upfront. A deposit (typically 25–50%) is normal, with the balance due on delivery.
For design inspiration and understanding quality benchmarks, review listings on leading tiny home platforms, where finished projects often note shell manufacturers and build quality.
DIY Finishing vs. Hiring Professionals: Planning Your Build-Out
DIY finishing makes sense if you have tool access, time, and baseline skills (framing, drywall, basic electrical/plumbing). You’ll save labor costs, often 40–50% of total build-out expense, but plan on 200–500 hours depending on size and complexity. Budget for tool rental or purchase (miter saw, circular saw, drill/driver, multitool, level, stud finder) if you don’t own them.
Tackle insulation and subfloor first. Spray foam offers the best R-value per inch (critical in thin tiny home walls) but requires a pro applicator or rental rig. Fiberglass batts or rigid foam are cheaper and DIY-friendly but need careful vapor barrier work. Install tongue-and-groove plywood or OSB subfloor over floor joists, glued and screwed.
Next, rough in electrical and plumbing. Many jurisdictions require licensed electricians for anything beyond basic outlet/switch work, and inspections are mandatory. For plumbing, PEX is DIY-friendly (crimping or push-fit connections), but vent stacks and drain slopes must meet code. If you’re off-grid, plan for 12V DC wiring or a hybrid system.
Drywall, flooring, and trim are time-consuming but learnable. Mudding and sanding drywall seams takes practice: consider hiring a taper if you want a smooth finish. For flooring, luxury vinyl plank (LVP) is durable, water-resistant, and clicks together without glue. Trim work (baseboards, door casings) benefits from a miter saw for clean 45° cuts.
When to hire pros: Structural modifications (moving walls, adding windows), HVAC installation (mini-split refrigerant lines require certification), and finish electrical (panel upgrades, code compliance). If your jurisdiction requires permits, inspectors will want to see licensed work for electrical and plumbing.
Hybrid approaches work well: hire an electrician for rough-in and panel, DIY the finish (outlets, switches, fixtures). Same for plumbing, pro sets the main lines and vent stack, you install sinks and faucets.
Be honest about your skill ceiling. A botched electrical job isn’t just costly to fix, it’s a fire hazard. If a task feels over your head, bring in a pro. Most trades will work on a time-and-materials basis for small jobs, and some offer consults to review your DIY work before you close up walls.
Conclusion
Buying a tiny home shell isn’t a shortcut, it’s a strategic choice for builders who want control over budget, timeline, and design. Vet your shell carefully, plan the finish realistically, and don’t skip permits or safety steps. Done right, you’ll end up with a home that’s both affordable and exactly what you want.